How to Fix Missed Scheduled Posts in WordPress

I’ve never had this happen before, so I was a bit surprised today when I went to make a blog post and saw one was scheduled for this morning, but it said missed schedule in red letters next to it.

It turns out that WordPress isn’t exactly the best at making sure things go in a timely matter. We’re used to computers doing everything exactly on time every time. The way WordPress works, if someone visits your site *around* the time it’s supposed to happen, it does it while that visitor is on your site.

In other words, if you schedule a post and nobody happens to come to your blog at that time..  It won’t post!

There is a simple solution to this..  Add a cron job! All you have to do is login to cPanel and add a new cron job. You’ll find cron jobs under advanced, but don’t be scared, I’ll walk you through it!

2016-01-25_18-45-18

2016-01-25_18-46-51

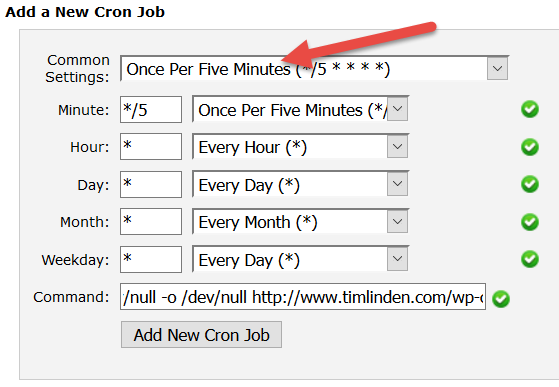
Next select the One Per 5 Minutes option, and enter the following code for the command. Just be sure to replace www.mysite.com with your domain. Also, if your blog is hosted in a subfolder, add that too.

wget -O /dev/null -o /dev/null http://www.mysite.com/wp-cron.php

The geekyness of this is that it will run the cron job every 5 minutes, and it won’t save the results anywhere. If you were to skip out the /dev/null stuff you’d end up with a bunch of files in your home directory, or worse, an email every 5 minutes.

That’s all there is to it. Then the server will run the WordPress cron job every 5 minutes. You’ll never miss a scheduled post again!


Updates to wpFutureCal

If you have a WordPress blog then you’ll definitely want to be using wpFutureCal. It’s a simple tool that shows a calendar of this month and next month. It then toggles the colors from red to green based on if you have a post that day or not.

Today I updated the plugin to give it more compatibility across hosts, and added in a new feature that shows the calendar on your WordPress Dashboard. When I realized I kept going to “Add New Post” every time I wanted to see the calendar, I knew there was a better way!

To get started using wpFutureCal all you have to do is goto Plugins -> Add New and enter wpFutureCal in the search box. WordPress will magically install it for you ;-) Did I mention I love writing WordPress Plugins?

Already have it? Then WordPress will tell you to update the plugin. Go for it! Once you do, go check out your WordPress Dashboard. You’ll probably want to move the calendar up top, but you can drag it wherever you like!

When to use List Automation

With List Automation on RocketResponder, you can do some really neat stuff. I’m sure someone else will come up with better ideas, but to get your brain juices started here’s what I like about List Automation!

But wait..  What is it? Oh yeah, List Automation allows you to “chain” lists so when a user gets added to one list, they can be added or removed from other lists at the same time. Which if you get creative, you can do some really cool things.

For instance.. You could have a list of people who haven’t purchased anything, and a list of people who have purchased something. When they are added to the purchased something list, you can have them automatically removed from the haven’t purchased anything list.

Or maybe you have a blog, and you want to entice people to subscribe to your blog in different ways. You could setup a list for your blog notifications, and another list for each of the freebies you give out. Then setup list automation to add them to the notification list when they are added to any of the other lists.

You see where I’m going here. What’s useful to know, they won’t have to confirm every action. As far as we’re concerned once you’ve double opt-ed in a subscriber you can add/remove them from other lists as you need. But of course if they unsubscribe from all your lists you’ll need to double opt in again to get that permission back.

Increase your opens by 50% with this one trick

I was visiting a local store whose business owner I know, and we got to talking about email. They use email at their store to drum up more business when new products come in or when business is slow.

One of the really cool things was they showed me their stats. And they did something interesting. Every time they emailed their customers, they sent up a follow up email to everyone that didn’t open the first email.

For most people that sounds really cool, but they don’t know how to do that. So obviously I added it to RocketResponder right away! When you go to send your broadcast, you’ll now see this option:

Resend your email

Now, this comes with a warning. If you already send emails daily, I wouldn’t use it. But if you send a monthly newsletter or have a really important email, definitely go for it. We don’t place internal limits on how often you can use it, but you don’t want to upset your customers!

This type of feature is available at other email providers, so don’t think I’m trying to say we invented something awesome. But I can say we charge way less than other email providers, while providing big deal features like this. In fact, we only charge $20 per month! How much are you paying?


How to unsubscribe RocketResponder subscribers using Gmail Labels

You might be thinkings..  Whaaat!? Why would I unsubscribe someone!? Well there are two reasons: 1) they asked to be removed or 2) they have an annoying vacation or auto reply message that floods your inbox every time you send an email.

Now with Zapier you can create an Unsubscribe label withing Gmail. Anytime you label an email Unsubscribe, it will automatically remove the person from your list! I am using it for my blog notifications list, and it’s great. For some reason people like to reply and ask to unsubscribe rather than click the link. So now in one click I can honor that request!

BONUS: Now that Zapier has published our RocketResponder apps as public, I can setup shared Zaps. So if you click here you can setup your label in easy steps, rather than manually doing it ;-)

How to connect WordPress to RocketResponder!

OK so I need your help. I literally coded this last night, and I think it’s amazing. But Justin isn’t so sure about it. So I want you guys to try it and give me feedback below.

Step 1: Create a Zapier account. Think of Zapier as the brain of everything. It takes information from one site and “Zaps” it to another.

Step 2: Accept my invite. Because we are new to Zapier they make your app hidden until a bunch of users have used it. Clicking that link and accepting allows you to use RocketResponder

Step 3: Click “Make a Zap!” on the top of any page. On the left side, type in WordPress and select “New Comment”. On the right side, type in RocketResponder and select “Subscribe Subscriber”

5-1-2015 8-06-07 AM

Step 4: Add your WordPress blog. You’ll have to put your blog URL and login information into Zapier.

5-1-2015 8-11-26 AM

Step 5: Add your RocketResponder account. Rather than using your login info, we use API Keys. The prompt has a link to the page you can copy and paste your keys into.

5-1-2015 8-10-58 AM

Step 6: Select a Trigger. I chose Approved simply because I don’t want spammers added to my list. You could leave it empty if you want.

5-1-2015 8-09-54 AM

Step 7: Connect the two together. Select which list to subscribe them to, then put Author Email for the email field and Author for the subscriber name field.

5-1-2015 8-12-20 AM

Step 8: Click the test button. I’ll be honest, not sure what could go wrong here, but hey click it. Then click the continue button.

Step 9: Give your Zap a name.

5-1-2015 8-14-45 AMThen click Turn Zap on!! That’s the fun part. Now Zapier will automatically check your blog and if it finds new comments, will send them over to your RocketResponder list. Wahoo!